A garter spring does not create the seal by itself, but it keeps the elastomer lip pressed against the shaft as operating conditions change. By the end, you will know how to specify, measure, install, and inspect the spring so its radial load supports sealing without causing excess friction or wear.
Key takeaways
- The garter spring sits behind the sealing lip and encircles the shaft.
- Steady radial force limits leakage while reducing heat and lip wear.
- Match wire diameter, free circumference, material, and spring tension when replacing it.
- Measure the old spring without stretching, cutting, or removing it from the seal.
Where the spring sits and how it supports the sealing lip
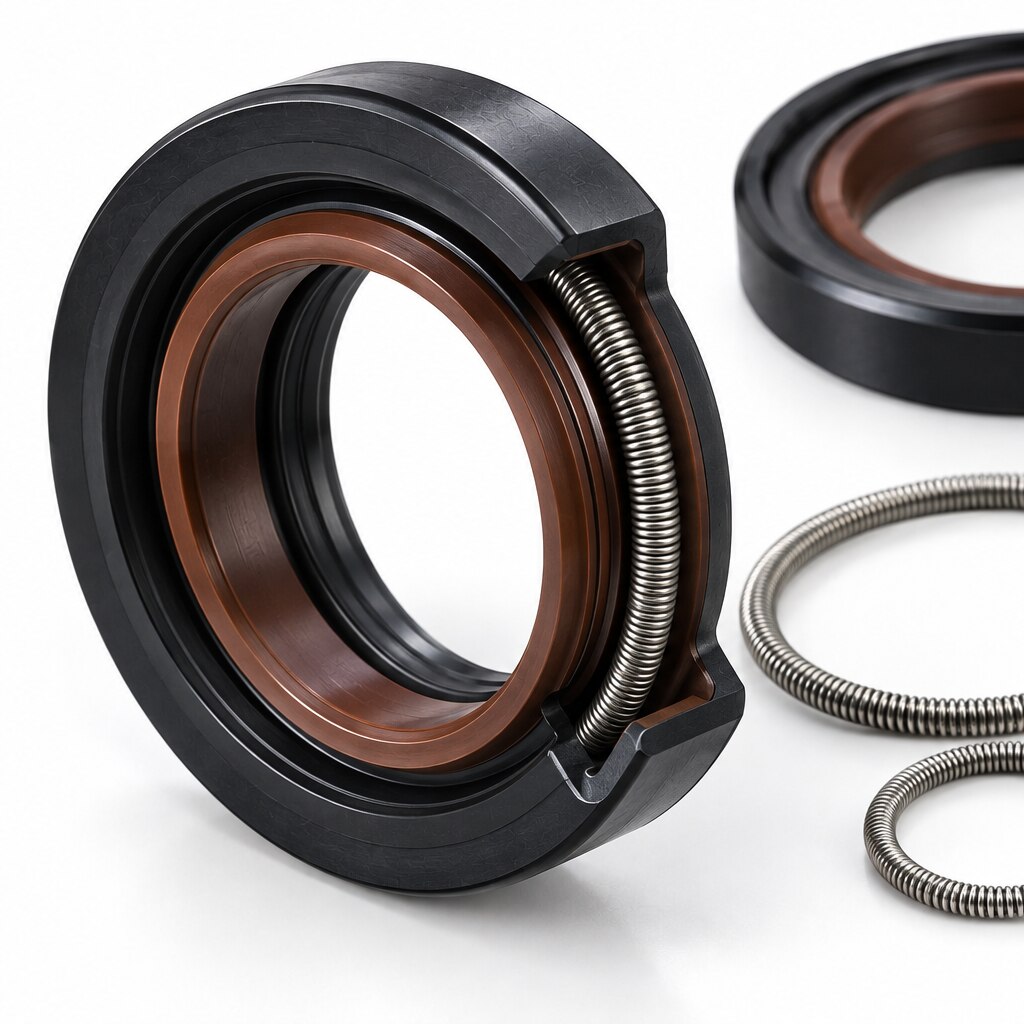
The oil seal spring position is immediately behind the sealing lip, seated in a molded groove or pocket that encircles the shaft at the lip’s contact zone. This garter spring surrounds the shaft rather than sitting on the exposed face of the seal.
Its circumferential tension produces radial force against shaft, pressing the elastomer lip evenly onto the rotating surface. The lip geometry, interference with the shaft, shaft finish, and lubrication create the primary pressure barrier; the spring maintains contact but does not seal independently.
Correct positioning lets the lip follow small shaft movements while retaining contact around the full circumference. It also supports contact as minor lip wear develops, but it cannot compensate for excessive runout, endplay, misalignment, a damaged shaft, or an incorrectly sized seal.
Check these conditions during installation:
- The spring must sit fully inside the molded groove, with no section riding over the lip or outside the pocket.
- The spring must be on the shaft-facing side behind the lip, not on the wrong side where it cannot apply the intended load.
- The spring joint must remain closed, aligned, and free from overlap or displacement.
- A spring outside the groove can cause immediate leakage, while a displaced section creates local lip loading, uneven contact, and abnormal wear.
- A spring installed with the correct force still fails if the lip runs dry, because the sealing interface requires a thin lubricating film rather than dry contact.
How steady radial force controls leakage, heat, and wear
Consistent radial pressure keeps the sealing lip in contact as the shaft rotates, the lip wears gradually, and the shaft moves slightly within its normal position. The garter spring provides that compensation only within its designed stretch range.
Too little force causes intermittent contact, lubricant leakage, and contamination ingress, especially during low-speed operation or across shaft runout.
Too much force raises friction, heat generation, shaft wear, power loss, and lip damage. The lip also needs a thin lubricating film: it reduces sliding friction while preserving the sealing contact. Temperature changes both parts of the seal.
Spring elasticity and relaxation shift with heat, while elastomer modulus, compression set, and chemical resistance also change; the spring’s temperature rating alone does not rate the complete seal.
Before increasing spring load, check these conditions:
- Excessive lip wear, an oversized shaft, large shaft runout, endplay, or a damaged shaft: the spring cannot restore the correct geometry.
- Lead grooves, spiral marks, excessive roughness, dents, rust, or misalignment: these defects can pump lubricant past the lip or repeatedly unload it.
- Low force: expect leakage and intermittent contact as the lip loses support.
- Excessive force: expect rising temperature, friction, shaft wear, power loss, and premature lip damage.
Correct the shaft, bearing, housing, or seal fault instead of using a stronger spring as a substitute. The spring maintains contact; the lip geometry, interference, shaft surface, and lubricating film create the primary pressure barrier.
Which specifications determine a suitable replacement spring
Request the installed radial spring force at the seal’s operating circumference before approving a replacement. Free diameter or free circumference, wire diameter, wire cross-section, and installed diameter describe fit, but free length or wire diameter alone cannot show whether the spring will press the lip correctly after installation.
Specify these details on the drawing or purchase order:
- Free diameter or free circumference
- Wire diameter and cross-section
- Installed diameter and radial spring force at that diameter
- Number of coils and pitch
- End configuration, including the joint design and overlap
- Material grade selected for the actual fluid, temperature, and contamination
- Surface finish, coating, or passivation condition
| Condition | What happens at the lip | Main risk |
|---|---|---|
| Undersized spring | Contact force falls as the seal operates | Leakage during low-speed rotation or lip wear |
| Oversized spring | The spring may not seat in the groove | Groove distortion, poor seating, or local lip loading |
| Excessive radial force | Contact remains tight but friction rises | Heat, shaft wear, power loss, and lip damage |
Do not confuse excessive force with excessive size: a correctly sized spring can still be too forceful. Match the load to the lip interference and elastomer hardness, then confirm the spring remains within its designed stretch range.
Select the material against the real service conditions; stainless steel is not automatically compatible with every oil, additive, temperature, or contaminant. A surface finish that pits, flakes, or abrades the elastomer can defeat an otherwise correct specification.
How to measure the old spring and confirm its fit without damaging it
Remove the spring without stretching it over a shaft shoulder, keyway, or sharp edge. To learn how to measure an oil seal spring, place it on a flat surface and record its free spring circumference or diameter without pulling the coils apart.
Use a micrometer with light contact for wire diameter; count coils and inspect pitch without compressing the spring.
Measure the seal groove and lip dimensions separately. Compare the spring circumference with the groove circumference, then confirm the installed radial load at the operating circumference rather than relying on free length alone.
| Measurement | Method | Reject or investigate if |
|---|---|---|
| Free size | Record circumference or diameter on a flat surface | Coils are stretched, separated, or permanently distorted |
| Wire and coils | Use light micrometer contact; count coils and inspect pitch unloaded | Wire is flattened, damaged, or spacing is uneven |
| End configuration | Inspect the joined ends under magnification | The joint is open, misaligned, overlapped incorrectly, or projects into the shaft path |
During trial fitting, confirm that the spring sits fully in the pocket, does not bind, and does not ride outside the lip. Check the correct lip orientation before assembly. A lead-in chamfer and a protected installation sleeve prevent the lip from inverting or catching the spring.
For a custom replacement, Shankar Spring And Coil Works can use these measurements to assess fit rather than copy a visually similar spring. Record the seal groove, shaft path, joint condition, and installed load together.
Related product
 | We supply all types of oil seals springs. We supply all types of oil seals springs in both GI (Galvanized Iron) SS (Stainless Steel). View product → |
What inspection findings reveal about spring failure
A correctly specified spring sits evenly in the lip pocket, retains its joint, and delivers the specified radial load at the operating circumference. Inspection findings separate oil seal spring failure from a worn lip or damaged shaft.
| Condition | What inspection reveals | Sealing symptom |
|---|---|---|
| Correctly specified | Even coil spacing, sound surface, closed joint, correct circumference and installed load | Uniform lip contact and stable leakage control |
| Low-force spring | Undersized circumference, thin wire, or reduced elasticity | Low spring force causes leakage at low speed, across shaft runout, or as lip wear increases |
| High-force spring | Oversized circumference or excessive installed load | Excessive spring force raises friction and temperature, wears the shaft, and can damage the lip |
| Corroded spring | Pits reduce wire cross-section and create fatigue stress concentrations | Force loss or fracture, even while the elastomer still looks serviceable |
| Fractured or poorly joined end | Open, misaligned, or inadequately overlapped end | A local high-load point can catch during assembly or separate in service |
| Unevenly spaced coils | Distortion, wrong circumference, or unsuitable joint | Uneven lip contact produces intermittent leakage and localized wear |
| Permanently relaxed spring | Free dimensions look acceptable, but elasticity has been lost | The lip remains under-supported during operation |
Inspect corrosion and broken joint condition directly; visual checks alone can miss reduced load. Quality control must verify:
- Material condition and corrosion damage
- Free circumference without stretching the coils
- Joint integrity and alignment
- Installed radial load at the specified circumference, temperature, and measurement condition
Do not approve a spring from free length alone. That check will miss wrong wire diameter, wrong circumference, open joints, and relaxation.
Frequently asked questions
Where does an oil seal spring sit?
It sits immediately behind the sealing lip in a molded groove or pocket, encircling the shaft at the contact zone.
How does an oil seal spring control leakage and wear?
The spring applies steady radial force that keeps the lip against the shaft; excessive force increases friction, heat, and wear.
Which specifications matter when selecting a replacement oil seal spring?
Compare wire diameter, free circumference, material, spring tension, joining method, and compatibility with the seal groove and shaft size.
How can you measure an old oil seal spring safely?
Measure its wire diameter and relaxed circumference in place or after gentle removal, without stretching, cutting, or sharply bending it.
What inspection findings indicate oil seal spring failure?
Look for a separated joint, corrosion, permanent stretching, kinks, broken coils, loss of tension, or a spring displaced from the lip groove.